Good Morning....
I've received this award from Angela over at Angela's Crafty Blogspace. Thanks Angela! It's always nice to know that there are people out there reading our blogs.
About the Liebster Award:
This award was created for bloggers who have fewer than 300 followers, but put a lot of love and heart into their work. It is given to bring light to new blogs and its a great way to share blogs that might not otherwise be seen or ones you want to share with others.
As a recipient you must share the love and pay it forward by.
1- Create a post where you blog about the Liebster award and reveal your 3 to 5 blog picks.
2- Let them know you have chosen them by leaving a comment on their blog about the award.
3- Copy and paste the award on your blog.
4- Have the faith that your followers will rally and show their crafty love back out to those you award this to.
5- Have fun!!!
It's that easy.
I've chosen to share it with:
Marilyn - Crafts and Beyond
Anita - The Hovey Hut
Tammy - Scrap Cave Creations
Patti - It's All Good
Julie - Mutch To Stamp
Be sure to check out the great inspiration on their blogs.
Yvonne

Thursday, March 31, 2011
Tuesday, March 29, 2011
Spotlighting with La Blanche Stamps
Hello
Making this a quick post as DH is coming home a day early and I need to finish up a few house things. lol Groceries in the house might be nice too. I don't cook much when I'm alone...that's why they make frozen dinners.
The stamp is from La Blanche stamps called "apple blossom".
The technique used is spotlighting. You pick a specific area and highlight it by layering and using pop dots for dimension. For more ideas you can check out splitcoaststampers.
Tim Holtz Distress inks used for coloring. and background colors.

That's all...no stories.
Enjoy your Tuesday!
Yvonne
Monday, March 28, 2011
Another Robot
Good Morning...
Just a quick little post today. Robot cut at 6". Pattern paper printed from Country Carnival cartridge.
His head and body are filled with Easter treats. lol

Just a quick little post today. Robot cut at 6". Pattern paper printed from Country Carnival cartridge.
His head and body are filled with Easter treats. lol

Plan on getting a card ready for tomorrow. Didn't have time yesterday as I was getting a package together to mail out. Watch your mailbox Xavier...your birthday is getting close.
Yvonne
Sunday, March 27, 2011
Cardabilities #27 - A Little This, A Little That
Hello There...
It's Sunday and I hadn't planned on sharing a card today but the creative mojo was working well so here goes....
The sketch is from Cardabilities. Be sure to check out what the design team has done and link your card to their blog.


It's Sunday and I hadn't planned on sharing a card today but the creative mojo was working well so here goes....
The sketch is from Cardabilities. Be sure to check out what the design team has done and link your card to their blog.
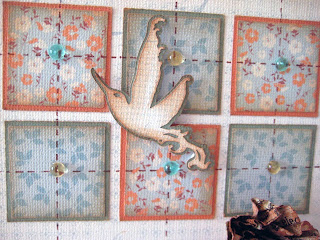
I've tried lots of different techniques with this card.
All the paper was white cardstock printed on the Cricut Imagine using Elise cartridge. Can you tell I'm having fun!

The bird was cut at 2" from Home Accents.

The flower cut from Wedding cartridge at 2.2" & 1.7". Each flower was cut a total of 4 times.
I used the Crafty Chronicle Newspaper by Debbie Salazar.
Altered the color of the paper with Glitter Mist to co-ordinate.
Brown liner pen to make the stitching. Tim Holtz Tea Dye ink for the distressing and the dew drops are smaller than the regular sized ones.

Time to get out of the craft room and go for a walk.
I'll see what I can get together for tomorrow...in the meantime enjoy your Sunday.
Yvonne
Thursday, March 24, 2011
Hello Spring
Morning...Doesn't this card just make you feel that spring is here.
Cardstock is from Co-ordinations. The green was embossed and then sanded.


Cardstock is from Co-ordinations. The green was embossed and then sanded.

Do you like the pattern paper. I printed it with the Elise cartridge on textured white cardstock.
My favorite is the flower. I got them from FargoCat Shops and they are gorgeous. Lots of different colors and sizes. Circles cut with nestabilities.

Butterfly stamped and cut out by hand, tiny pearls added to the body. Hello cut from Lyrical Letters.
Ribbon also from FargoCat Shops. Do you like that bunched up look? You can watch a tutorial over at Amazing Grace blog on how to do it. Basically it's just a running stitch with just a little different twist.
Can't forget my dew drops - they always help to fill any void space.

Off to take a Copic Coloring class today. It's not a certification but thought I would check it out. My coloring has been self-taught so I'm sure there will be something I can learn from it.
Hope spring is coming to you soon if it already hasn't. Here for me it is about the temperature that I wished it was year round. We're now averaging daytime about 82 F. From here on out that figure will just keep rising. Good thing I like the heat.
Yvonne
Tuesday, March 22, 2011
Script With Flowers
Good Morning...
I've been busy playing - trying to share my time between card and scrapbooking.
Today's share is again using a La Blanche stamp - Script With Flowres and Tim Holtz Distress Inks.
I did use the specialty paper for stamping and the Cut & Dry nibs for coloring the image.
A little different technique on this card - after everything was colored to my liking I applied Versamark over the entire image and embossed it with UTEE powder. If you're not sure what that is - it's embossing powder with really big crystals so when it melts it's not smooth but rather pebbly looking. I only applied one coat. The more coats you apply the glossier and smoother the finish. It makes a nice contrast to the matt background paper.

Click on photo to see the pebble appearance.

Enjoy your Tuesday.
Yvonne
Sunday, March 20, 2011
Heads Up - Cricut Imagine - RGB Codes
Good Morning...
Just had to post this scrapbook page I made yesterday with my new Cricut Imagine.
I have so many tips to share with you today. Also if you've asked some questions on previous posts please scroll to the end of post for your answers.
First I'll start with the "Imagine". Despite things I've read and researched about the machine I had NO problems. I did the updates via computer, it cuts and prints fantastic. There is a small learning curve but anything new there will be some trial and errors.
These photos are of my DD being bored and silly not long ago. lol She can always make smile.
The green cardstock is co-ordinations and the remaining cardstock was printed on white textured from Walmart and cut with the cricut. The green/yellowish paper was more yellow when I printed it so I inked the edges with Tim Holtz Shabby Shutters. The newspaper looking piece is a pattern on Country Carnival Cartridge. The font and patterns on the words are also from the same cartridge.

The letters are layered and I can substitute in different patterns or colors to coordinate.
The key, head and filigree images are from Wall Decore which is a regular Cricut cartridge but can be used in the Imagine and flood filled with color and patterns.


The picture of Kristen had an all white background so I used Tim Holtz Tea Dye ink and softened the look to a more vintage style.

The key image and filligree were cut at 1.5". It does an amazing job on detail prints and cuts. You can also see how it re-sizes the print pattern depending on the size of your image. The border and the key are the same pattern.
If you have any questions about the machine be sure to leave me an e-mail address that I can reply to.
The sketch for the layout is from Sketchabilities. You can pop over to their site to see how more layouts.

If you're still with me I'll answer a few questions that I've received.
Pricing on the Imagine - Right now it's on sale at cricut.com for $299.00 - it is available for shipping to Canada.
Costco paper used on previous post - All my Costco paper is from three or four years ago.
Walmart cartridges - If you go on-line you can get 2 for $60.00 otherwise they are $39.00 each. You can have them shipped to your local Walmart for free.
I know this is a long post but I've got one more great thing to share.
As I mentioned we have a new computer and with that some of my old programs won't work with it so I've been having to find alternatives - yes and that means learning something new. I'm getting the hang of Photoshop and thought wouldn't it be great to be able to take a color from the background of the photo and figure out the RGB codes and then I could print my paper to match on the Cricut. It worked but was time consuming. This morning I search the web and found two great sites.
First site is Big Huge Labs . It's free and has lots of neat components but my favorite is the Color Palette Generator. You can take any picture, load it into the program and it will give you a list of colors that coordinate. How cool is that? I quickly figured out the only thing cooler would be if it gave me the RGB codes. You see...it gives them to you in HEX. I'm not really sure what HEX is and it doesn't matter. RGB is the Red, Green, Blue from the color wheel.
So....I had to find a program that would convert for me....RGB Converter I found one that you don't have to download anything - you just copy-paste or type in your Hex code and it tells me the numbers I need to put into my Imagine or any other software program that allows you to alter color.
I think that is it for today! It you read the whole thing - thanks for sticking with me.
Have a wonderful Sunday....
Yvonne
Friday, March 18, 2011
La Blanche Stamps
Hi There!
Today a card using the new La Blanche Stamps. Firstly, these stamps have amazing detail. They are a silicone stamp and apparently that's how they can get such fantastic detail.
The company that makes the stamps also has their own brand of white cardstock. Yes, I bought some and I did the stamp test. Normally I'm a big fan of Stampin' Up's white, so I stamped the image twice - once on each piece of paper. There was a difference on clarity of the fine lines. Also the paper works great for blending the Tim Holtz inks.
So on the card I used their paper brand of paper - Deborah is selling it over at FargoCat Shops by the individual sheet if you want to try it out. She also has the stamps, ink and Cut & Dry Pen Nibs that I used.

This is the neat part... once you have the image colored and it's dry take your blending tool and start with a light color for the background. I used Tea Bag and blended the color over the entire piece of paper. That's how I got that light brown in the background. Next I took my Mini Mister and spritz just a LITTLE water in a couple of the corners and then blotted it with paper towel immediately. Blended Vintage Photo around the outer edges of the cardstock avoiding the image area. I added just a little of the Wild Honey here and there too. Adding the water effect helps to give it an aged look.
Tea Bag was also used on the edges of the cardstock and the embossed background.The little flowers were stamped with Worn Lipstick on the brown cardstock and punched out. A pearl attached to the centre. The edges of the image were also distressed for an aged effect.

Today a card using the new La Blanche Stamps. Firstly, these stamps have amazing detail. They are a silicone stamp and apparently that's how they can get such fantastic detail.
The company that makes the stamps also has their own brand of white cardstock. Yes, I bought some and I did the stamp test. Normally I'm a big fan of Stampin' Up's white, so I stamped the image twice - once on each piece of paper. There was a difference on clarity of the fine lines. Also the paper works great for blending the Tim Holtz inks.
So on the card I used their paper brand of paper - Deborah is selling it over at FargoCat Shops by the individual sheet if you want to try it out. She also has the stamps, ink and Cut & Dry Pen Nibs that I used.

Click on image for a close-up!
I started with Momento Ink and stamped image on white cardstock. Make sure it's dry before you start coloring the image. Using their specialty paper it takes a little longer to dry. Using the Cut & Dry Nibs I colored in the flowers with Tim Holtz Worn Lipstick and Wild Honey. The blue around the clock Weathered Wood. I can't remember exactly which green I used or the brown on the clock. Possiby Brushed Burlap or Frayed Cordoroy. Those nibs are wonderful little tools - my first time using them. They come 10 to a pack so you can either have one for every color ink or you can rinse them out when you're finished and let them air dry.
This is the neat part... once you have the image colored and it's dry take your blending tool and start with a light color for the background. I used Tea Bag and blended the color over the entire piece of paper. That's how I got that light brown in the background. Next I took my Mini Mister and spritz just a LITTLE water in a couple of the corners and then blotted it with paper towel immediately. Blended Vintage Photo around the outer edges of the cardstock avoiding the image area. I added just a little of the Wild Honey here and there too. Adding the water effect helps to give it an aged look.
Tea Bag was also used on the edges of the cardstock and the embossed background.The little flowers were stamped with Worn Lipstick on the brown cardstock and punched out. A pearl attached to the centre. The edges of the image were also distressed for an aged effect.

Now I told you yesterday I was waiting for the Little Brown Truck - UPS - well it finally arrived around 4:30. I was starting to panic that he wasn't going to deliver my new toy. I bought a Cricut Imagine. It will print and cut your images. You can also print your own cardstock and pattern paper. After deliverying hubby to the airport - I almost made him jump from the car with his luggage while it was still moving - I came home and spent the evening setting everything up. It appears to be in working order so I plan on creating something this week-end.
So I know what I'm doing this week-end...what about you?
If you're looking for a Spring Time Crop FargoCat Shops is hosting one in Port Hawkesbury April 1 - 3rd. Info can be found on the website.
Yvonne
Thursday, March 17, 2011
Recessed Window Card
Morning... Happy St. Patrick's Day!
Okay...I've been missing for a few days but I've had a good reason. We bought a new computer. Our old desk top was lets just say "old". You know that commercial where people come in to rob the house and they leave the computer behind? That would have been us. lol It's taking awhile to get everything re-loaded.
Past week-end we also went to Fort Worth, Tx. Visited with some of Kevin's family which was fun. Once I get the photos uploaded to the new computer I'll post a few from our adventure.
Today's card is a recessed window style. I used the new Angel Trumpet Flower set with the co-ordinating die - Spring Medley.


Flowers were colored with copics but the hummingbird was colored with Twinkling H2o's on watercolor paper.
Copic colors used:
YG 11 - Mignonette
YG23 - New Leav
RV10 - Pale pink or RV000 - Pale Purple (use either or both)
RV21 - Light Pink
R85 - Rose Red or E04 - Lipstick Natural (use either or both)
Instructions for the recessed card can be found at Splitcoaststampers. Patterned paper was Costco package. The inner pink layer embossed with the bubble folder. Focal image raised up with pop dots.
I will be back tomorrow with a card using La Blanche stamps.
Cricut.com has a sale on their cricut cartridges. There was a whole selection of cartridges made exclusively for Walmart. I've used Lacey Labels a few times on my projects and some of you were having trouble locating that cartridge. Cricut has it for 27.99. Walmart prices here are $39.00 and I must say at that price they have not been moving. I'm hoping they will get tired of having the same stock on the shelves and drop the prices.
Finally I'm waiting for the little brown truck and the UPS man to come a calling....I have something new arriving today...can you guess what it is????
See you tomorrow and I'll tell you then.
Yvonne
Friday, March 11, 2011
More Tulips
Good Morning...the week-end is here.
This is the last in the series of tulip cards - for now anyway. If you look back through the previous posts you can see all the different tulip stamps that come in the one package. If your just stopping by for the first time the stamps are from Heartfelt Creations.
Paper is from Stampin' Up!.
Nestabilities for the circles. White cardstock embossed with the script folder and using Tim Holtz Distress Ink Bundled Sage lightly brushed ink across the cardstock just touching the high areas.

Copics Used:
G21 - Lime Green
G85 - Verdigris
R27 - Cadmium
R29 - Lipstick Red
R35 - Coral
R36 - Strong Red
R59 - Cardinal
R 32 Peach

You can see I have three layers. Stamped base on white cardstock circle and then stamped tulip two more times on scraps. The complete first layer I used the die from Heartfelt Creations - Springtime Medley to cut it out. The top layer I also cut with the die and then with scissors trimmed so I was left with just the outer petals.
What about that ribbon? Stitched on the edges and it ties nicely. You can find the ribbon as well as most of the products used today over at FargoCat Shops.

As for me this week-end...didn't make Mardi Gras last week-end so heading to Fort Worth tomorrow morning. Will definitely be going...already booked hotel and it's non-refundable. lol I'm sure I'll have some pics or stories to share on Monday.
Enjoy your week-end.
Yvonne
Tuesday, March 8, 2011
Cardabilities - Design Team Announcement
Hello There...
I have some very exciting news to share with you. Cardabilities has just released their new Design Team members and I'm on it! My term doesn't officially start until April. I love working from a sketch! Supplies and theme are our discretion so it gives me lots of room for creativity!
Twice a month a new sketch is released. This is the current sketch. Once you complete the sketch you can upload your card to Mr Linky and have an opportunity for some great prizes.

I played along with this sketch and here's my take on it. My little nephew has just celebrated a birthday and I needed to get a card made. I used "Boys Will Be Boys" cartridge for the rocket ship - cut at 2 inches.
I computer generated "Blast Off" and the inside sentiment.
Distressed the edges with ink and stitched around the edges for more definition.

This is the first time I've used my cricut for the entire card. I generally use my stamps for cardmaking and the cricut for scrapbooking.

Now I better get the card in the mail. His birthday has already pasted! :(
As always thanks for stopping by...and to those who have recently subscribed to my posts or as a follower...WELCOME.
Yvonne
Monday, March 7, 2011
Purple Tulip & Glimmer Mist
Good Morning...
Oh...it is going to be such a great week! I'm so excited....I have lots of things to share with you so be sure to pop in all week long.
I did go and do my first spinning class this morning. It was amazing. Worked really hard but padded bike shorts might be nice. I won't bother to give you any more descriptions than that. lol
For those of you wondering if we made it to Galveston for Mardi Gras...nope...weather was wet and cold on Saturday and Sunday we bought some new plants for the front yard. It's going to look so perty!
I'm still working with the tulips from Heartfelt Creations. I'm wanting to show you all the different stamps that come in the set.
A couple techniques on this card.
The frame is from Lacy Labels Cricut Cartridge - cut at 4.50 inches. There are actually three layers there. The purple layer (and you can't see if on the photo) was altered with Pop Rocks Glimmer Mist. I had purple cardstock but it wasn't quite the right shade but I spritzed it with Glimmer Mist and it not only changed the color just enough but glammed it up too! Remember to try and alter your paper if you need to get it to match a little better. You could use Smooch or chalks, inks....lots of options.


Copics Used:
BV02 - Prune
BV13 - Hydrangea Blue
BV17 - Deep Reddish Blue
RV10 - Pale Pink
G21 - Lime Green
G85 - Verdigris
Tulip covered with Diamond Stickles.
Leaves covered with Rock Candy Stickles.
Frame and tulip layered with pop dots.
Pearls added.
Most items can be found at FargoCat Shops.
Thanks for stopping by today.
Yvonne
Friday, March 4, 2011
Toot! Toot!
Good Morning....
That is me tooting my own horn this morning....I finally made one of the highlighted threads in the Cricut Chirp. You ask...What is the Cricut Chirp?
Cricut has their own website and forum. You post your projects up in the forums. I posted my magnetic ABC Robotz in the vinyl section. Each week Cricut sends out a newsletter featuring about half a dozen entries. I was so excited last night when I saw my post that hubby thought I must have won something....lol I did tell him though for a job well done I should get a prize...a Cricut Imagine would be nice. lol
Onto a card for today. Products used on this card were all Stampin' Up. I really like the embossing folder...it does just the edge. The image was colored in with markers directly to the stamp. Fast, simple card but yet elegant.

Week-end plans anyone? We're thinking about heading to Galveston on Saturday for some of the Mardi Gras events. Left it too late so can't get a room but it's only about 1 1/2 hours drive.
Need to get something accomplished today. Have a good week-end!
Yvonne
Thursday, March 3, 2011
Augustus Tulips - Happy Easter
Hi There,
Finally got a new card to share with you.
I had ordered some stamps from FargoCat Shops and received them on Monday. Gotta love shipping in the states. Deborah mailed them Saturday from Florida and I received Monday.

The flowers are from one of Heartfelt Creations newest releases. HCPC 3361 and I also used the matching Tulip dies from Springtime Medley Die set HCD 709. Just for a note if you didn't want to purchase the dies this is a beautiful set all on it's own.
Flowers colored with copics -
Y02 - Canary Yellow
Y06 - Yellow
YR02 - Light Orange
Leaves -
YG23 - New Leaf
G14 - Apple Green
Diamond Stickles added over top of flowers. Dimensionals used to raise cut portion.

Don't you just love the ribbon border. That is a Martha Stewart Punch - Linked Trim.
It's about an inch wide and fits about 1/2" ribbon. So pretty.
The die cut frame was from "Storybook" cartridge cut at 3".

Happy Easter - from Easter 2010 cartridge cut at 1". Diamond Stickles also overtop of letters.
Sponged some of the edges with Vintage Brown.
Hope to get a few more cards done with some of these new stamps.
Yvonne
Subscribe to:
Posts (Atom)