Monday, January 31, 2011

Last Day at CHA

Good Morning,

This is my last full day at CHA. It's been a lot of fun but so busy.

Cricut people. New FREE software. If you've owned Design Studio it will work similiarly. It's still in the testing phase but I've seen it and think it looks great. Basically you will download the program onto your MAC or PC and you can design on your computer and cut from your cricut. There is a new Cricut Expression 2 being released that will work with this program  on WiFi without having any cords. I believe if you have an older Expression you will need a cord to connect.  The great thing is it's on the computer so you can save your projects and pull them up on anybody's computer cause you will have a log-in account. Won't have to do downloads to update like you do now. Gypsy will work sync with this program as well.

Taken beginner and advanced Tattered Angel courses you will see lots of ideas with those.

I also took a class on Stampmaker by Theresa Collins. Make your own stamps. It was pretty cool and easy. The stamps have great images. Here's a link to watch it. You can also make stencils and embossing folders.

There's is a new stamp company from Germany....gorgeous stamps...I think Deborah might get some of those....I hope....they would work great with Tim Holtz products but more feminime side rather than masculine/grunge.

Don't want to give away to many surprises.
Todays Card...
The heart flourish was stamped twice. The background cardstock was textured with the Retro Circles 2 embossing folder and inked with Pumice Stone.
I love the little pearls.

Keeping it short as I'm writing a bunch at the same time.

Yvonne

Saturday, January 29, 2011

Stamping On Fabric & CHA update

Hello,

This is number three of my Vintage Valentines.

The doily image was stamped with versamark and embossed with Tattered Rose Distress embossing powder.

The image on the fabric heart  was stamped with Fire Brick.

I added a little button with a piece of ribbon threaded through it. The original card from the class was supposed to be stapled. I'm still not all that keen on staples on my cards. I'm working up to it.

I did use the heat tool to melt the ribbon slightly on the left side. Gives it more of a vintage feel. I also liked the little pins with the heart ends. So cute.
Hope I'm keeping you entertained while I'm away.

Had a great time yesterday at CHA. The highlight of my  day was winning a Big Shot! Thankfully it was the last class of the day cause it was heavy to pack around.

 My favorite class of the day was "Tattered Angels 101". Learned lots of great techniques with the glimmer mist and today at noon I'm taking the second part. I'l be sharing lots of ideas in the coming weeks. My hands maybe permanently dyed though as we did make 25 different pages yesterday...all housed in a wonderful binder.

I also did a mini album book by Suzy West and a class by EK Success. The EK Success focused on altering different electronic items or anything else alterable. I'll try and get some pictures today to show you what they altered.

Got to run...the shuttle is a coming....

Yvonne

PS - Canvas is really big this year.

Thursday, January 27, 2011

Another Couple Mug Shots

Morning,

Here's another couple coffee mugs that I did. The paperline is Basic Grey - Pyrus, Tim Holtz Distress Ink - Broken China is a great match for the paperline.

Stamps & dies used for the flowers are from Heartfelt Creations. Can't forget the pearl for the centre.

The was left over paper in my scrap bin. Congratulations cut from the Cricut. Flowers are Prima. It's a closer match in person. This little cup is for my neighbor...she's starting a new job.
Made it to LA - met Deborah at the airport. Lots of classes tomorrow. I'll try to log in Friday night and give you an update.

I'm off and running...catch up with you soon.

Yvonne

Cupid - Shooting Arrows

Hi There...

The flowers on this card were done using a Paper Blossom punch. I have never used these punches before to make flowers and was not very good or fast at the whole shaping procedure. If I had an opporunity I'd give them another try. After we punched the petals they were inked withWarm Red and Chestnut Roan (Colorbox Cat's Eye inks).

Cupid was embossed with Walnut Stain Distress embossing powder.

Keeping it short today.

Just getting ready to head to the airport. Looks like Halifax is experiencing some weather problems.
I think Deborah's flight made it out this morning...but there appears to be lots of delays/cancellations.Let's hope she makes it to LA. The hotel room is booked in her name...lol
Yvonne

Wednesday, January 26, 2011

I Miss You & a Treat

Hi There,

This is the project that I thought was so cute. No stamping at all on this one!

Card is 6 x 6. Background paper is from Bo Bunny. I thought it was so cute and it is double sided. The birds and birdcage are Tim Holtz dies. Birdcage cut from glitter cardstock and the birds from Stampin' Up paper.

Rounded the birdcage and used dimensionals to raise it up. Birds and background paper distressed with Pumice Stone ink.

The "I miss you" cut with the cricut. Alphalicious cartridge. The cricut cuts glitter cardstock very well. The little heart was from a punch and them heat embossed with pink EP.

Added some bling to the holes in the bottom of the birdcage.

Decided to make a treat cup to go with the card. The template for the mug can be found at scor-pal.
The instructions say you need an extra 4 x 4 piece of paper. I was able to make the entire mug with a 4 1/2 x 12" piece. The pattern paper on the circle tag at the top is actually the centre out of the handle.

I used vinyl in black and red to create the border around the mug. The I Love You is also out of vinyl.

There's some peanut M & M's inside the mug. I had some nice white organza bags so put the treats in there.

These mugs are really very quick to make...decorating them is what takes the time. You can probably cut, score and assemble in under five minutes.

I have a couple more I've done that I'll share soon.

Yvonne

Tuesday, January 25, 2011

Be Mine

Good Morning,

Okay, I'm going to be on a Valentine roll for a few days. I did take a class where we made four vintage style Valentine cards so I'll be sharing those but I do have a couple that I designed myself and if I must say so I think they are so cute! I need to buy some candy before I can post the projects though. Intrigued...stay tuned!

This card used lots of Tim Holtz products. Grungeboard was used to cut out the images from the "Heart Wings" die. The crown was gold embossed with bling added. The heart embossed with Fired Brick Distress embossing powder. The wings painted with Ranger Picket Fence crackle paint.

The kraft colored paper was embossed using the Flower Vine & Twizzle folder and Pumice Stone ink applied over top. The edges were distressed.


That's all I have for today.

Have a good one!

Yvonne

Monday, January 24, 2011

Winter- Not Everyone Likes It!

Good Morning,

I've had a busy few days crafting. DH left on the week-end on a business trip so that left me home alone with my paper, stamps, cricut & gypsy. What more could a gal ask for? :)

I'll be sharing stuff all week...right up until I leave for CHA on Thursday. I'll be meeting up with Deborah from FargoCat Shops. Scheduled to take some great classes and looking forward in seeing some of the new releases.

As you know I'm working on my calendar for 2012. I posted the February pages earlier this month but just got January completed.

The journalling you probably can't read but Xavier is the one not impressed with the snow. Daddy even built him a snowman but he was having no part of playing in the snow. Mommy's arms were just fine.

Pattern paper from Basic Grey - Blizzard. This was a line from a couple of years ago.

The photos printed in black & white then edges with Tim Holtz Distress Ink - Vintage Photo. The shadow on the snowflake and the word winter also edged in vintage photo.

Snowflakes and basically anything in that blue color was cut out of white vellum. Sponged Distress Ink- Tumbled Glass over all vellum to make it blue then lightly sponged white pigment ink over top to add texture and that snowy look.


All snowflakes were sponged with Tumbled Glass.


The above image cut from Gypsy Wandering. All snoman parts cut from Glitter cardstock.
All remaining cuts are from Designer Calendar with the exception of "Brrrr" which was cut from Alphalicious cartridge.

The vellum snowflakes have a blue cardstock layer cut exactly the same size beneath them.
All vellum pieces were ran through a Xyron so no glue would show.

I'm entering this into the "neglected cartridge" Challenge. I had Designer Calendar a year before I made anything!

That's all for today. I'll see you tomorrow!

Yvonne

Tuesday, January 18, 2011

Water Stamping

Morning All!

I really liked this card. I decided to try some of the techniques from Tim Holtz's book "A Compendium of Curiosities". Because of copyright reasons I can't share on public space exactly how the technique was done but I'll share my colors and my added twist to it.
The multi-colored background started out being vanilla cardstock. Using the ink blending tool I added the colors of Distress Ink - Peeled Paint, Barn Red & Stormy Sky. It was the combo that would match the Basic Grey - Curio line the closest. I then followed the instruction for the water stamping. Did you know that Distress Ink is reactive with water and makes the image appear as though its been stamped with bleach.  Now I added my own twist and stamped the image a second time with Pumice Stone. Also sponged Pumice Stone around all the edges of the papers.

Used a cuttlebug embossing folder on the Curio pattern paper and then lightly rubbed Pumice Stone ink over that as well. I wanted to hit just the high areas so the embossed image would stand out even more.

The little embellishment on the right side was from the Cricut - Lacy Labels.
Also used Nestabilities circles and Lacey Circles.

Do you see that ribbon on the corner of the card? It worked perfectly to look like it was a bow around the stem of the flower. That is ribbon from Maya Arts and is called Moss. It tends to be on the goldy side.

Thanks for stopping by today. If you're looking for some of the products used check out FargoCat Shops.

Looks like another rainy day here but the temperature has at least warmed a bit.

Yvonne

Monday, January 17, 2011

Lily Dazzlers

Good Morning!

Up early and posting. Had a wet, dreary week-end here in Houston.

For today's share I used a variety of products and techniques. Sometimes you forget what you have and it doesn't get as much use as it once did.

Anything that is silver are Dazzlers (with the exception of the word "for you" that was heat embossing with silver.) Dazzlers are metallic stickers. For a closer look click here - FargoCat Shops. You remove the image from the sticker sheet and place it over cardstock, pattern paper, vellum or directly onto glass. Lots of possibilities. It gives the look of embossing with the muss & fuss.

Maybe you don't want a silver or gold look...not a problem. Use either your copic markers or sharpies and color over top of the silver to alter the color. Pretty easy.

If you look closely at the small flowers those were colored in with a glaze pen.
The border was punched on either side and then embossed with a swiss dot border folder. Co-ordination paper used so I was able to lightly sand the top and have a lighter shade of green show through. Some small silver dragon Dazzlers applied.

This particular set is designed to be layered for a more dimensional look.

Do you like my orange pearls? Once again dig out the copics and color your lighter color pearls any shade you want to match your projects. I color them while they are still attached to the original packaging...makes it easier.

Cardstock used was Bazzill Bling & Co-ordination with the pattern paper - Basic Grey - Curio.
BTW if you're up for a card class using this pattern paper you can check out FargoCat Shops.

Lacy Labels cricut cartridge to make the label at the bottom.

Get out there and enjoy your Monday!

Yvonne

Saturday, January 15, 2011

Never Too Many Teddys!

Hi There...

Enjoying your week-end? Well if your stuck in the house with the winter blues or just holding up because of bad weather I thought I might be able to distract you for awhile and share a scrapbook page.

Xavier got a REALLY big teddy for Christmas and it seems to be his new best friend. As I go down through the photos I'll list the techniques and cartridges that I used.


The banner was part of a label from the Storybook cartridge. I cut it twice once green and once brown.
The scalloped frame - Accent Essentias but I cut off one side of the scallops.
The teddy bear cut from Christmas cartridge. "Cute as a" was cut from Alphalicious. Both the top green title and the side were lightly stippled with ivory craft ink and then heat embossed with UTEE. Only one layer of power was used so it would give an uneven texture. The chipboard button was completed inked with the ivory and two coats of UTEE applied.

Crystal Effects used on Teddy's nose and eyes. Two coats applied to get the thickness I wanted. Make sure you let it dry between coats.

How I textured Teddy!
On the cricut drew the outline of teddy with brown ink and then cut out. Chalk used to color in paw pads and muzzle. Lightly sponged Distress Ink Wild Honey over bear. Followed that with Brushed Corduroy and Frayed Burlap.


Apply the darker colors and more of it where you think the shadows would be.


There will be a second page coming in a few days. I just received more photos.

Thanks for stopping by and I have a card for you Monday. Yes, it's already made!

Yvonne

Tuesday, January 11, 2011

A Little This...A Little That...

Hello There!

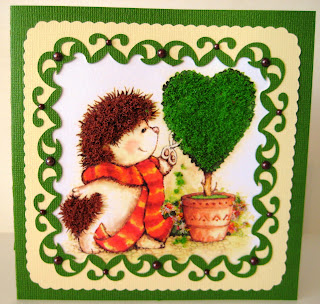
Feeling I needed to give something new a try. I used my cricut to make the frame and flower-soft to jazz up the pre-printed image.You know, if you had regular cards, (the ones you buy, gasp) you could customize some of those with flower-soft, then they would be home-made. Just a thought!

The frame was cut using Lacy Labels. That is the Walmart exclusive cartridge I used last week. I cut the frame at 4.75" in height (yellow piece) and the co-ordinating layer at the same size (green decorative). I needed to create an opening in the centre of the yellow. You have to use a gypsy or design studio to weld the two pieces together and then cut on the cricut.
I started with the hedgehog and used nut brown, sharmrock green and a spring mixture for the flowers.
I see I have a fleck of green in the hedgehogs hair. Wasn't really planned but maybe I'll leave it there.
Doesn't he look adorable...I just want to ruffle his hair.

 Gosh...maybe I need to get out more.

To jazz up the frame I added some brown pearls.
I've got a stash of that stuff so I figure I might as well use it.


I think I might try a few more cards/projects using my cricut for some of the elements.

On a side note they have started showcasing the new Spellbinders. Start at Debbie Olson's blog and you will be able to make your way through each entry. They are posting  reveals each day. Be sure to enter for a chance to win on each of the blogs.

Flower-soft products can be found at Fargocat Shops.

Back to crafting.

Yvonne

Monday, January 10, 2011

Basic Grey-Pyrus

Good Morning...

Hope you had a good week-end. I didn't do anything special. I did spend all day yesterday working on this card. It was one of those days when things just aren't happening in the creative department.

I wanted to use the Basic Grey- Pyrus collection. I was also trying to follow Mojo Mondays sketch. I only succeeded on about half of it. Marilyn did a really good job.

I had a pear all colored up (that I took way too long coloring) and then when I was assembling the card I decided it didn't go. In the end everything was sponged with Tim Holtz Distress Ink - Vintage. Nestabilities cut all the circles. The birthday sentiment is from Just-Rite Stamps. I was just browsing around Fargocat Shops and see that both the Pyrus and the stamp set are on clearance and only one set of each left. The paper is really pretty and has a lot of options. The flower is primas. Dimensionals were used to give more depth.
I'm thinking about doing a project on canvas. I'll keep you posted on how that goes.

Have fun today.

Yvonne

Thursday, January 6, 2011

Remainder of Xavier's Book

Hello

As promised here are the remaining pages in Xavier's book.
                                                 Flap opens up......

We were on a carosel so the green circle at the bottom played music when pushed.

The butterflies are glittered. This is picking out letters that spell his name.

The muffin is a little shaker. Poppy was feeding him muffin...he usually wasn't allowed sweets.

Xavier at the airport having to go home.

Hope you enjoyed my little book.
Friday I'm heading off to a scrapbook store to see what they are offering for classes. I'll let you know what I find.

Yvonne

Wednesday, January 5, 2011

For My Xavier

Good Morning,

This is one of the presents I was working on before Christmas.

This was a book I made for Xavier. We don't get to see him often so I wanted to make something to help him remember who we are between visits. I wanted this to be an interactive book so it would be more fun to look at than just pictures. I had a lot of fun making it and all the pictures are from when he visited last March.

I used my Cricut for most of the embellishments. If want to know a specific cartridge used e-mail me and I'll try and figure it out. I'm only going to share half the book today and half tomorrow as it is pretty long. The pages are 8 x 8.

The book itself I used an unfinished album from Zutter. I was able to bind it myself. Covered the inside and outside cover with pattern paper and then mod podged it to help preserve it a bit. I added lots of ink sponging to the edges to softent he look.
Click on the photos if you want to read the journalling.

I love the faces peaking through the windows. The maple leaf was a punch!

We took a trip to the Houston Zoo. Cuttlebugged the words "Houston Zoo". Eyelets added.

I didn't get a good photo of this page.

Here I also cuttlebugged a piece of vinyl an attached it to the outside of the page protector. It's to simulate the feel of elephant hide.

Similar idea on this page but I used a piece of felt.

This was at home in our backyard. It's one of my favorite pages.


The cowboy hat is interactive. I used magnet so the hat can be taken on and off.


There are another five or six pages I'll post tomorrow.

Yvonne

Tuesday, January 4, 2011

The Winner Is & New To Me Technique...

Good Morning...

First things first...Thank you to everyone who visited my blog on the January 1st Blog Hop. I appreciated all of your kind comments. I did try and get back to visit some of your blogs but when I tried to leave a comment it wouldn't let me. There does seem to be more of an issue leaving comments if you don't do word verification on your comments section. I got that information from the internet as it seems I'm not the only one having a problem.

Also welcome to the new followers.

Without any further chit chat ... the winner is #52  I used random.org to generate the number.

Congratulations Bonnie C

A Scrap Above said...
I love your LO and Calendar page, great work.
I am a new follower of your blog
TFS and a chance to win
Bonnie C
http://ascrapabove.blogspot.com
ascrapabove at aol dot com

Now onto today's project. I tried a little something different today. I colored on pattern paper with my copic markers.

The pattern paper is Basic Grey - Curio. The punch is Martha Stewart. Pearls - from my Christmas stash. Ribbon - Walmart and dyed with Tim Holtz Distress Ink Vintage.
Products can be found at Fargocat Shops.

Stamped the rose on the pink Curio paper with Momento Ink.
Choose copic colors that were a close match to the paper.
In this case...
YR00 - Powder Pink
E93 - Tea Rose
E95 - Flesh Pink.

You do have to be a little careful regarding getting too close to the black lines. It will run a little.

Finished and then cut out. A little Vintage ink rubbed on the edges to soften.

I don't think it took much ink cause you don't have to color in solid. I certainly didn't saturate my paper. If you give it a try let me know how it worked for you.

I'll check in with you tomorrow.

Yvonne