Good Morning....
I've received this award from Angela over at Angela's Crafty Blogspace. Thanks Angela! It's always nice to know that there are people out there reading our blogs.
About the Liebster Award:
This award was created for bloggers who have fewer than 300 followers, but put a lot of love and heart into their work. It is given to bring light to new blogs and its a great way to share blogs that might not otherwise be seen or ones you want to share with others.
As a recipient you must share the love and pay it forward by.
1- Create a post where you blog about the Liebster award and reveal your 3 to 5 blog picks.
2- Let them know you have chosen them by leaving a comment on their blog about the award.
3- Copy and paste the award on your blog.
4- Have the faith that your followers will rally and show their crafty love back out to those you award this to.
5- Have fun!!!
It's that easy.
I've chosen to share it with:
Marilyn - Crafts and Beyond
Anita - The Hovey Hut
Tammy - Scrap Cave Creations
Patti - It's All Good
Julie - Mutch To Stamp
Be sure to check out the great inspiration on their blogs.
Yvonne

Thursday, March 31, 2011


Tuesday, March 29, 2011
Spotlighting with La Blanche Stamps
Hello
Making this a quick post as DH is coming home a day early and I need to finish up a few house things. lol Groceries in the house might be nice too. I don't cook much when I'm alone...that's why they make frozen dinners.
The stamp is from La Blanche stamps called "apple blossom".
The technique used is spotlighting. You pick a specific area and highlight it by layering and using pop dots for dimension. For more ideas you can check out splitcoaststampers.
Tim Holtz Distress inks used for coloring. and background colors.

Making this a quick post as DH is coming home a day early and I need to finish up a few house things. lol Groceries in the house might be nice too. I don't cook much when I'm alone...that's why they make frozen dinners.
The stamp is from La Blanche stamps called "apple blossom".
The technique used is spotlighting. You pick a specific area and highlight it by layering and using pop dots for dimension. For more ideas you can check out splitcoaststampers.
Tim Holtz Distress inks used for coloring. and background colors.

That's all...no stories.
Enjoy your Tuesday!
Yvonne
Monday, March 28, 2011
Another Robot
Good Morning...
Just a quick little post today. Robot cut at 6". Pattern paper printed from Country Carnival cartridge.
His head and body are filled with Easter treats. lol

Just a quick little post today. Robot cut at 6". Pattern paper printed from Country Carnival cartridge.
His head and body are filled with Easter treats. lol

Plan on getting a card ready for tomorrow. Didn't have time yesterday as I was getting a package together to mail out. Watch your mailbox Xavier...your birthday is getting close.
Yvonne
Sunday, March 27, 2011
Cardabilities #27 - A Little This, A Little That
Hello There...
It's Sunday and I hadn't planned on sharing a card today but the creative mojo was working well so here goes....
The sketch is from Cardabilities. Be sure to check out what the design team has done and link your card to their blog.


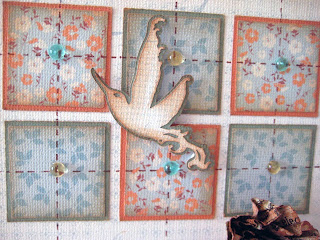

It's Sunday and I hadn't planned on sharing a card today but the creative mojo was working well so here goes....
The sketch is from Cardabilities. Be sure to check out what the design team has done and link your card to their blog.
I've tried lots of different techniques with this card.
All the paper was white cardstock printed on the Cricut Imagine using Elise cartridge. Can you tell I'm having fun!

The bird was cut at 2" from Home Accents.

The flower cut from Wedding cartridge at 2.2" & 1.7". Each flower was cut a total of 4 times.
I used the Crafty Chronicle Newspaper by Debbie Salazar.
Altered the color of the paper with Glitter Mist to co-ordinate.
Brown liner pen to make the stitching. Tim Holtz Tea Dye ink for the distressing and the dew drops are smaller than the regular sized ones.

Time to get out of the craft room and go for a walk.
I'll see what I can get together for tomorrow...in the meantime enjoy your Sunday.
Yvonne
Thursday, March 24, 2011
Hello Spring
Morning...Doesn't this card just make you feel that spring is here.
Cardstock is from Co-ordinations. The green was embossed and then sanded.


Cardstock is from Co-ordinations. The green was embossed and then sanded.

Do you like the pattern paper. I printed it with the Elise cartridge on textured white cardstock.
My favorite is the flower. I got them from FargoCat Shops and they are gorgeous. Lots of different colors and sizes. Circles cut with nestabilities.

Butterfly stamped and cut out by hand, tiny pearls added to the body. Hello cut from Lyrical Letters.
Ribbon also from FargoCat Shops. Do you like that bunched up look? You can watch a tutorial over at Amazing Grace blog on how to do it. Basically it's just a running stitch with just a little different twist.
Can't forget my dew drops - they always help to fill any void space.

Off to take a Copic Coloring class today. It's not a certification but thought I would check it out. My coloring has been self-taught so I'm sure there will be something I can learn from it.
Hope spring is coming to you soon if it already hasn't. Here for me it is about the temperature that I wished it was year round. We're now averaging daytime about 82 F. From here on out that figure will just keep rising. Good thing I like the heat.
Yvonne
Tuesday, March 22, 2011
Script With Flowers
Good Morning...
I've been busy playing - trying to share my time between card and scrapbooking.
Today's share is again using a La Blanche stamp - Script With Flowres and Tim Holtz Distress Inks.
I did use the specialty paper for stamping and the Cut & Dry nibs for coloring the image.
A little different technique on this card - after everything was colored to my liking I applied Versamark over the entire image and embossed it with UTEE powder. If you're not sure what that is - it's embossing powder with really big crystals so when it melts it's not smooth but rather pebbly looking. I only applied one coat. The more coats you apply the glossier and smoother the finish. It makes a nice contrast to the matt background paper.


I've been busy playing - trying to share my time between card and scrapbooking.
Today's share is again using a La Blanche stamp - Script With Flowres and Tim Holtz Distress Inks.
I did use the specialty paper for stamping and the Cut & Dry nibs for coloring the image.
A little different technique on this card - after everything was colored to my liking I applied Versamark over the entire image and embossed it with UTEE powder. If you're not sure what that is - it's embossing powder with really big crystals so when it melts it's not smooth but rather pebbly looking. I only applied one coat. The more coats you apply the glossier and smoother the finish. It makes a nice contrast to the matt background paper.

Click on photo to see the pebble appearance.

Enjoy your Tuesday.
Yvonne
Sunday, March 20, 2011
Heads Up - Cricut Imagine - RGB Codes
Good Morning...
Just had to post this scrapbook page I made yesterday with my new Cricut Imagine.
I have so many tips to share with you today. Also if you've asked some questions on previous posts please scroll to the end of post for your answers.
First I'll start with the "Imagine". Despite things I've read and researched about the machine I had NO problems. I did the updates via computer, it cuts and prints fantastic. There is a small learning curve but anything new there will be some trial and errors.
These photos are of my DD being bored and silly not long ago. lol She can always make smile.
The green cardstock is co-ordinations and the remaining cardstock was printed on white textured from Walmart and cut with the cricut. The green/yellowish paper was more yellow when I printed it so I inked the edges with Tim Holtz Shabby Shutters. The newspaper looking piece is a pattern on Country Carnival Cartridge. The font and patterns on the words are also from the same cartridge.


Just had to post this scrapbook page I made yesterday with my new Cricut Imagine.
I have so many tips to share with you today. Also if you've asked some questions on previous posts please scroll to the end of post for your answers.
First I'll start with the "Imagine". Despite things I've read and researched about the machine I had NO problems. I did the updates via computer, it cuts and prints fantastic. There is a small learning curve but anything new there will be some trial and errors.
These photos are of my DD being bored and silly not long ago. lol She can always make smile.
The green cardstock is co-ordinations and the remaining cardstock was printed on white textured from Walmart and cut with the cricut. The green/yellowish paper was more yellow when I printed it so I inked the edges with Tim Holtz Shabby Shutters. The newspaper looking piece is a pattern on Country Carnival Cartridge. The font and patterns on the words are also from the same cartridge.

The letters are layered and I can substitute in different patterns or colors to coordinate.
The key, head and filigree images are from Wall Decore which is a regular Cricut cartridge but can be used in the Imagine and flood filled with color and patterns.


The picture of Kristen had an all white background so I used Tim Holtz Tea Dye ink and softened the look to a more vintage style.

The key image and filligree were cut at 1.5". It does an amazing job on detail prints and cuts. You can also see how it re-sizes the print pattern depending on the size of your image. The border and the key are the same pattern.
If you have any questions about the machine be sure to leave me an e-mail address that I can reply to.
The sketch for the layout is from Sketchabilities. You can pop over to their site to see how more layouts.

If you're still with me I'll answer a few questions that I've received.
Pricing on the Imagine - Right now it's on sale at cricut.com for $299.00 - it is available for shipping to Canada.
Costco paper used on previous post - All my Costco paper is from three or four years ago.
Walmart cartridges - If you go on-line you can get 2 for $60.00 otherwise they are $39.00 each. You can have them shipped to your local Walmart for free.
I know this is a long post but I've got one more great thing to share.
As I mentioned we have a new computer and with that some of my old programs won't work with it so I've been having to find alternatives - yes and that means learning something new. I'm getting the hang of Photoshop and thought wouldn't it be great to be able to take a color from the background of the photo and figure out the RGB codes and then I could print my paper to match on the Cricut. It worked but was time consuming. This morning I search the web and found two great sites.
First site is Big Huge Labs . It's free and has lots of neat components but my favorite is the Color Palette Generator. You can take any picture, load it into the program and it will give you a list of colors that coordinate. How cool is that? I quickly figured out the only thing cooler would be if it gave me the RGB codes. You see...it gives them to you in HEX. I'm not really sure what HEX is and it doesn't matter. RGB is the Red, Green, Blue from the color wheel.
So....I had to find a program that would convert for me....RGB Converter I found one that you don't have to download anything - you just copy-paste or type in your Hex code and it tells me the numbers I need to put into my Imagine or any other software program that allows you to alter color.
I think that is it for today! It you read the whole thing - thanks for sticking with me.
Have a wonderful Sunday....
Yvonne
Subscribe to:
Posts (Atom)