Showing posts with label Scrapbooking. Show all posts

Monday, September 16, 2013

City Chase Part 1

Hi There,

Well it's been a really long time since I blogged. Lots of stuff on the go and I've even had projects to post but just needed to edit them. That's the part I have trouble getting done. I want them to magically go from my camera disk to  my blog.

So I finished scrapbooking this years City Chase. Lots of cricut cuts. The journaling tells the story. I made cricut cuts for some of the events we didn't get pictures for.

All pattern paper is from Making Memories called "Chloe's Closet". I must admit I'm getting tired of that paper pack. I bought it at Michaels 5 or 6 years ago. 18 patterns 36 sheets. I think it keeps multiplying.

As I did the pages I wrote down which cartridges I used, sizing and any other special cuts/techniques I used. (See end of post for info).
Gotta love all the bling I added to the letters and the existing flowers. See that time...only two minutes to spare in crossing that finish line!

Corresponding page...more bling. I liked the arch. Was able to manipulate the size and shape using the Cricut Craftroom.
We were pulling a bus but didn't get a picture of the bus.


Vellum windows and glossy accents for the light on the bus.
 
Sponged the kangaroo for added texture. Used the markers in the Cricut to outline and add more definition.
 
City Chase - CTMH - Artistic 1.3"
2013 - CTMH - Art Philosophy (layer) 1.25"
Journaling Tag - Elegant Edges
Banner - Art Philosophy 1.25"
Bus - Recess - 5.25"
                      - Tim Holtz Distress Ink
                      - Wild Honey
Kangaroo - Animal Kingdom 5"
                 - Tim Holtz Distress Ink - Frayed Burlap
                 - sponges
                 - Cricut markers
                 - black pearls
Black micron pen for stitching

There are four more pages of the Chase and then I just finished a new page of Korben. I think it was probably a record for time spent on page. Everything just fell into place. Doesn't happen often.
 
I'd say "See you tomorrow" but you just never know what is going to interrupt my computer time, but I'll try to stop back and post again soon.
 
Thanks for reading!
 
Yvonne

Thursday, July 4, 2013

Pawprints On Our Hearts!

Happy July 4th! Just celebrating a quiet day...getting a little scrapbooking done.

This is officially my first doggy scrapbook page. Kristen and Joel adopted a rescue puppy a couple of weeks ago and she is a sweetie. When I went to Toronto to visit they already had her and she knows how to suck up. She liked the toy I bought. lol Patches, the cat is slowly adjusting and letting Lacey know who really is queen of the domain.

The octagons cut from George & Basic shapes at 1". Each piece of embossed with a heart folder separately so they would all have exactly the same placement of design. All cream colored paper distressed with Stampin' Up ink - River Rock.

Font - Letter Envy at .8"
Hearts - George & Basic Shapes 1.5"
Paw Prints - Meow 1.5"

Lace died with River Rock ink.
Lacey has certainly found herself a wonderful home.
Yvonne


Thursday, May 30, 2013

Jake and the Neverland Pirates Birthday

Hi There,


I was recently visiting my grandson for his 4th birthday. Birthday theme was Pirates or more specifically "Jake and the Neverland Pirates. Mom did the decorating. Notice the multi colored cake. Steph food colored the batter. So cool.

The map and yellow pirate chest paper printed from Buccaneer cartridge. The images of the crab, mermaid, Happy Birthday and ship mast also cut from Buccaneer.
The sea monster cut from Pirates and Mermaids.
Old West and Black letter for font.
 
 
Cuttlebug folder bubbles to emboss sea monster.


Sizing
Buccaneer - Mermaid 3"
                    Happy Birthday Matey 3"
                    Crab 1.8"
                    Anchor 2.75"
                    Mast 4.5"
Old West - Jake .8"
                   Neverland Pirates .5"
Pirates & Mermaids - Sea Monster 3"
Black letter - and the .4"
Tim Holtz Distress Inks - Frayed Burlap & Rusty Hinge to ink the sea monster and red mats.
Twine, Dimensionals, misc pattern paper and cardstock
Machine Used: Cricut Imagine
Designed by: Yvonne Balmer

Thanks for stopping by.
Yvonne

Saturday, April 6, 2013

Brotherly Love

HI There,

Another scrapbook page of my favorite topic. Grandsons.

The first photo was taken just after Korben was born. It was so funny because Mom & Dad had told Xavier how important it was to hold his brothers head cause babies couldn't do it for themselves.
As soon as they set Korbon in front of Xavier he immediately grasped his head...it looks more like he's got him in a wrestling hold. lol


Cartridges Used:
Paper Doll Dress Up - Frog 3.5" & 4.2"
Art Philosophy - hearts 1" & 1.2"
Elegant Edges - Banner 9.25 x 1.85 (Utilized CCR to customize the size and also be able to create a shadow layer as there wasn't one)
Boys Will Be Boys - Font .6 & 1.3 (Even at .6 it cut very well)

All stitching with a brown micro pen. Green paper inked with Distress Ink Crushed Olive. The ant stamp from Stampin' Up - Bugs & Kisses
 
Yvonne
PS - Getting close to  my trip to see those boys in person! Just think of the new photos I can take!

Saturday, February 16, 2013

Here's Tigger!

Morning,

Here's Korben on his first Halloween.

Ever wonder how to get typed print onto a cricut shape? Cut out the shape on your cricut that you want the type written words to be on. Then I design the journalling on Word or any other similiar  program. Print it out on regular paper.  Place the shape behind the printed words and see whether you need to adjust the font size or spacing. Once you're happy with it (I might have to do the printing on regular paper three or four times to get the sizing right) tape your piece of cardstock that you cut with your cricut overtop of the writing on the regular paper. Feed it through the printer again and the words should have printed onto your cardstock. On the top journalling box I had didn't have it quite lined up as I would have liked it. I felt there was too much space on the left side so I put a paw print in the space. Worked out perfectly. On both shapes I inked the outside edges and added faux stitching.
Inked the edges on Tigger too.
Cartridges Used:
Meow - paw print
Winnie The Pooh
Craft Room Basics
Art Nouveau - Tiggers & One

Spent the last couple of days working in the flower beds. We've dug up one of the front flower beds and rearranged all the shrubs.  I bought the cutest little egg shaped plant pots at Lowe's for $1.25 and planted Gerber Daisys in each. Maybe next week I'll try and post a photo. It's looking really good and a little springy.

Yvonne

Monday, February 11, 2013

It's Superman

Good Morning,

Here's hoping everyone who was hit by Old Man Winter was able to stay warm and safe.

Sharing Xavier's Halloween pictures from 2012.

I used the Cricut Superman cartridge for all of the cuts.
Yes, Superman has lots of tiny pieces to put together. I think he was cut around 6".
Used the planet from the second page to put on the first page.

I really like the glasses. They are meant to be cut out for kids to wear. How cool is that?
The sizing proportions on the above page was meant to be more of 81/2 x 11" but I used CCR to stretch it to a 12 x 12.

Used photoshop 10 to get the red border around the picture. You can do some neat things with photoshop. Still learning them all.
My Journalling. Currently working on Tigger's page.
Thanks for stopping by today and I promise to come back tomorrow with a Valentine project! I'll probably need to post everyday this week to get them all shown!
 
Yvonne
Wednesday, January 30, 2013

This Is What CUTE Looks Like

Good Morning,

Today's layout is the one I made to share over at Cricut FANatics. This is my Grandson at about 2 months old. I just loved the little tongue sticking out and almost mischief in the eyes.

I started with pattern paper from DCWV - All About Boys. Matted the photo in two shades of blue.
The giraffe cut at 5" from Imagine cartridge - Blast Off. Arrows - Art Philosophy-straight arrow 1.9" and curved arrow 2.5"
The scalloped shape cut twice from the Artiste cartridge. Once at 6.2" and again at 6.4"
The diamond pattern also from Artiste cut at 2".There was two layers to the image. I used CCR and welded four of them together to create the grid. I liked the rhinestones for added dimension.
The font is from Animal Antic. .5" for blue letters and 1" for CUTE. I used a red micro pen to stitch around the green letters as well as around the scalloped mat.
The diamond border is from Artiste cut at 1.75". The small diamond in the centre was the negative from the panel above.
All orange pieces distressed with Tim Holtz Ink-Spiced Marmalade and green pieces - Crushed Olive. .01 Micron red pigment pen used for stitching.

Machines Used: Imagine, Expression 2, CCR
Cartridges Used: Artiste, Art Philosophy, Blast Off, Animal Antics
Supplies Used: Red Micron Pigment Pen, Distress Ink Tim Holtz - Crushed Olive & Spiced Marmalade, Recollections - Rhinestones, DCWV pattern paper, cardstock

Enjoy your Wednesday!
 
Yvonne

Tuesday, January 8, 2013

Decorating Cookies!

Hi There,

Me here in wet and rainy Texas. I had such great plans of posting this layout yesterday and I couldn't get blogger to let me upload pictures from my computer. I thought, oh well, this is just a minor glitch and it will be fixed tomorrow. Tomorrow came - today - and it still wasn't fixed. I went to the Cricut message forum and posted a query....some lovely person was also having the same problem but had a work around. So here I am!

This is the last in the series of visiting Xavier last November. We've had the decorating of the tree and the making of the cookies. Lastly came decorating the cookies. I totally forgot 2 1/2 year olds don't understand how much to put on and move to a new spot on the cookie. I had originally bought those candy gel pens, the ones that the icing never turns hard on. No a good idea, but Mommy came to the rescue and made some old fashioned butter icing. The she put each color into a baggy and cut the tip off. Much easier for a little person to control.

This layout was particularly challenging as I only had two 12 x 12 sheets of the pattern cardstock, so I had to figure out how to cut it. There is a big whole behind the square on the co-ordinating page.
I did use inks to soften the edges on the vanilla papers as well as the green cardstock and pattern paper. Xavier's art smock is a orange red versus a Christmas red which also proved challenging. All the images where cut with the Cricut.
As you can see the whole family got into decorating. Poppy was taking the pictures. Now Auntie Kristen wasn't with us but she still had a hand in things. This year when she came to Texas for Christmas I was working on the layout. I cut out some paper shapes that reflected our real cookies and she decorated those with stickles. The only person missing from partaking in the event was Joel. Next time.
The next post up will be a card using the cuttlebug, H2o's and a brayer.
 
Thanks for stopping by!
Yvonne

Thursday, January 3, 2013

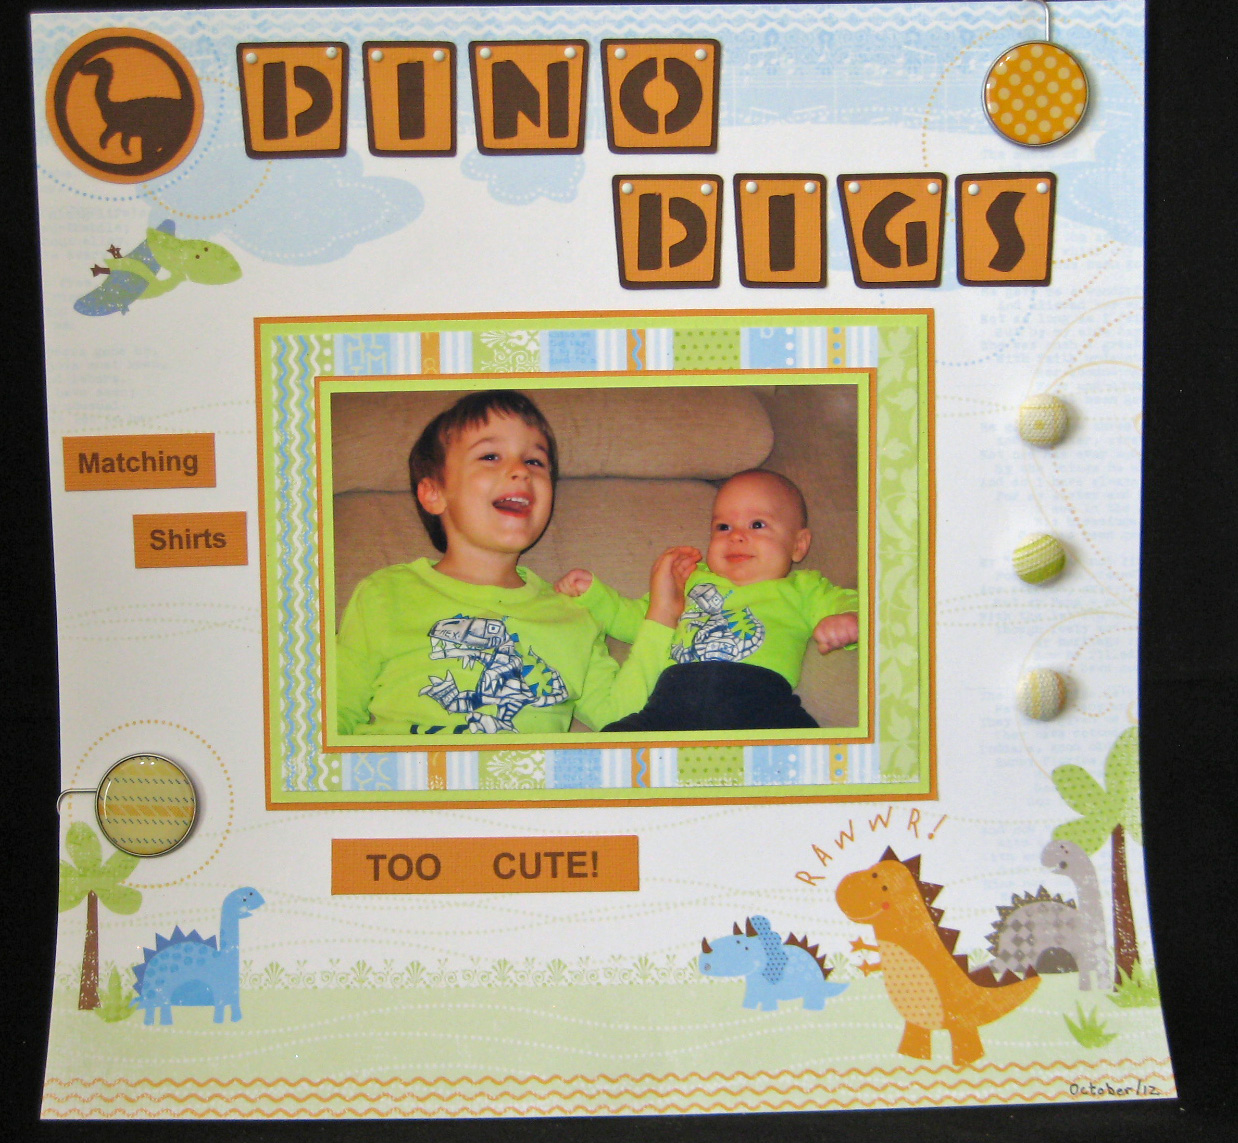
Dino Digs

Hi There,

Getting my first post up of 2013! For Christmas we received a CD with lots of pictures and videos of Korben and Xavier! It was wonderful to look through all the pictures and the videos were great. Thanks to Kristen I also now know how to get stills from a video.

When Korben was born I found matching dinosaur shirts for the boys. I couldn't resist. Stephanie took pictures of the boys in their new digs.

Over Christmas break I had taken a trip to Archivers and found some paper that was perfect. It from Little Yellow Bicycle - babysaurus.
The title and dinosaur in left corner are Cricut - Dinosaur Tracks. Paper clips and fabric buttons from Chloe's Closet by Memory Makers. I bought that line about four years ago. Couldn't believe how well it matched!
So this page went together very quickly. That does not happen often. I'm in scrapbook this week but I will have some cards again soon as I have a class to teach next Wednesday. It's going to involve the cuttlebug, brayer and alcohol inks.

Happy Thursday!
 
Yvonne

Monday, December 31, 2012

Let It Glow!

Happy New Years Eve!

I had a wonderful Christmas, Kristen joined us in Texas and we had so much fun. There will be more scrapbook pages coming to verify that. I will have a second Christmas soon when Xavier and Korben make it back to NB. With all the snow the Maritimes have been receiving they have been having an extended stay with Steph's family in PEI. Lucky them...yes I'm so jealous! When they return home the kids or Xavier will open his presents from us on Skype.

My project I'm sharing is actually decorating the tree with my son and family in 2011.We had visited  in November and they purchased an artificial tree so we could be there for the decorating.
It was Xavier's first Christmas that he could really help with the decorating. It was so much fun.


I like this border of snowflakes and then some bling.
Those lights were hard to make. I wanted to keep the size small and it was intricate cuts. 1.75 was the smallest I could go. The ribbon and bulb were both glittered after they were cut. The under layer is gold paper. I really liked how I strung the gold cording. It reminded me as a kid at Christmas when we got cards. We would run a length of string  from one nail to another on the wall or between the window frames and then drape the cards over the string.

The pattern paper was from a Christmas pack by The Paper Studio called Holiday Wonder. Remaining cardstock Bazzill. Lots of glitter and bling used on the pages - after all it is Christmas!

Wishing everyone all the best for 2013!
See you in the New Year

Yvonne

Project - Scrapbooking
Cricut Machine - Imagine & Expression & CCR
Cartridges
Elegant Edges (scalloped square) 9.35" & 9.00"
Art Philosophy - Let It Glow - 1"
Art Philosophy - Snowflake - 3.50"
Art Philosophy - Snowflake Border - 9" length
Art Philosophy - Presents - 1.75"
Create A Critter2 - Tree - 4.25"
Celebrate With A Flourish - Lights - 1.75"

Thursday, September 6, 2012

So Tiny!

Morning Crafters!

I have another scrapbook page of Korben to share.

Baby's are so tiny and perfect and can MELT the heart of anybody.

The photos here are of Korben's hand with Xavier, then Daddy, and Poppy.
The poem reads:
When those tiny fingers curl
So sweetly around your own,
You'll feel some of the deepest joy
That you've ever known
Because it doesn't take so long
To understand how much
Your whole life can be transfermed
By a gently baby's touch
A shot of Korben's tiny feet and comparing it to Daddy's- big toe!
This poem reads:
Someday I'll jump through puddles,
Take a stroll or run a race.
Someday I'll walk across the street,
Or maybe walk in space,
Someday I'll scale a mountain,
Or I'll join a ballet corps.
Someday I'll walk a tightrope,
Or explore the ocean floor.
Someday these feet will do some things,
That only Heaven knows,
But for today they're happy
Just to wiggle all their toes.
The triangles cut with Art Philosophy cartridge. Cartstock and chipboard. Co-ordinations cardstock used, embossed with swiss dots cartridge, then sanded and finally inked. The poems were printed on vellum, then layed over the purple cardstock and a scalloped grey mat underneath. Lettering on Korben Sizzlets Dies used.

I'm trying to head out for a bike ride but checking to see if my tire is holding air. There will be a longer story if I get out on the rode and get a flat again.

I'm off...Have a GREAT day!
 
Yvonne

Wednesday, August 29, 2012

Introducing Korben!

Good Morning,
I would like to introduce you to my newest Grandson!  I think he is such a beautiful baby. The top picture he was about eight days old.

I loved the cloud paper. The  clouds are cut from felt and the felt had a protective backing to it that could be pealed away and then it exposed the adhesive. I did cut this with my Imagine - I set it to cut twice to make sure it cut all the way through.

Heaven Sent - I added silver bling to the words and swirls.

The ribbon across the picture also had adhesive already applied to it....that a nice feature...unless you wanted to make a bow. The ribbon just repeat the word "Baby". Click pic for close-up.

The flowers are silk and from Stampin' Up. For the centres I used co-ordinating cardstock and the tool for covering your own brads. Worked like a charm.
I have Mom & Korbens hospital bracelet and the measuring tape so I wanted to incorporate those on a page.
The little silver clip reads "It's a Boy". I think that is a Memory Maker accessory.
Lightly sponged blue ink around the white borders and added light blue faux stitching.
I really wanted to keep the pages blue and white with a touch of silver.
Cartridges Used:
Clouds - Superman
Swirls - Elegant Cakes
Heaven Sent - CTMH - Art Philosophy
Scalloped Border - CTMH - Art Philosophy

Can't wait to share my next pages with you.
 
Have a Great Day!
 
Yvonne

Thursday, August 9, 2012

Artist At Work

Hi There,

Still trying to get back in the grove of things. I've had this page done for awhile but haven't posted it.

The pattern paper I bought at Michaels, I think. I actually had it before I had the picture. Xavier loves to paint himself more than the paper. When we were up visiting, Xavier had painted Nana and Poppy to beautiful wooden frames. They are similar in color to his hand painting. I will be putting some photos of him into them for sure and will be displayed with love.

The splats of paint in the background were cut using a sizzix die. Don't use them often anymore but won't part with them...you never know when they will come in handy.

The frame shape was from a cricut cartridge. The cute easel, paint tubes and artist pallet were purchased embellishments...but they were so cute and perfect for the page.
Thanks for stopping by and have a great Thursday.
PS - Don't tell DH but I've got the new CTMH Artiste cartridge coming today. :)
My neighbor came over yesterday and we were designing  to decorate here white canister set.
They are coming along quite well and I'll share when they are finished.

Yvonne

Tuesday, July 3, 2012

I'm Back

Hi There,

I'be been gone for awhile now.  I did get back a week ago from Toronto but just haven't gotten around to posting. So first things first. I'll talk about the scrapbook page for those who come here to see craftiness and if you're here to find out what I've been doing personally, just scroll to the bottom and I'll give you an update.

This scrapbook page is the co-ordinating page for the first one here.  Imagine cartridge Notebook Doodles for the pattern paper. It's just so much fun. The playground equipment was a digital download from CCR.
I used ink to create some shadows on the paper pieces. If you don't like working with ink try chalks. The best thing about chalk is if you don't like it take a white eraser and erase off the chalk.
I do have lots of other projects to share I just need to make time to get them up!

I'm going to share a few photos of my trip to Toronto. As many of you know my daughter, Kristen and I competed in the City Chase which is a six hour event whereby you uncover the clues and then navigate your way to the destination in order to complete a physical task.
We did this last year and came away saying "those tasks were pretty easy!" Let me tell you this year they were definitely a lot more physical.
I'll share a few photos at the end of each post over the next few days.
This was the most difficult event.
1. Crawl along the ground under a net.
2. Crawl through tires (those were darn small tires - if I was much bigger I would have had a tough time!)
3.  Weave in and out of some sticks - that was easy.
4.Kristen sends me back to the start where we left our backpacks. Somebody needed to get the camera. lol
 Get over the wall pictures below - Kristen took some fine photos of me trying to get my butt over (not posted). Thanks Kristen!
5. There is a long bungee cord. One of us on each end. First one to kick of the pylon over wins other one has to do squat with weighted bar.
6. 10 squats with bar.
7.No picture - Attach a parachute to your body and run a course.

 As Kristen is posing I'm planning how I'm going to win this round. I don't think she expected me to start pulling so quickly. She was probably taking it easy on me....there was no way I wanted to do squats. "Incentive"


Finish Line!
There were 1200 teams in total - 445 teams completed the required elements - we placed 250! 

If you're still hanging in there, thanks for letting me share this special experience. Maybe tomorrow it will be snakes & worms!

Yvonne